Continue to Next Page on Excel Landscape
By default, Microsoft Excel prints worksheets in portrait orientation (taller than wide). You can change the page orientation to landscape on a worksheet-by-worksheet basis.
Change the page orientation
-
Select the worksheet or worksheets for which you want to change the orientation.
Tip:When multiple worksheets are selected, [Group] appears in the title bar at the top of the worksheet. To cancel a selection of multiple worksheets in a workbook, click any unselected worksheet. If no unselected sheet is visible, right-click the tab of a selected sheet, and then click Ungroup Sheets.
-
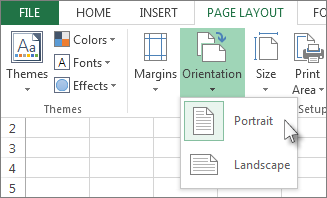
On the Page Layout tab, in the Page Setup group, click Orientation, and then click Portrait or Landscape.
Notes:
-
If you don't have a printer set up, the Orientation option will appear dimmed, and you won't be able to select it. To resolve this, you must set up a printer. The option also appears dimmed when you're editing the contents of a cell. To resolve this, press Enter to accept the changes or Esc to cancel the changes.
-
Because you can set page orientation on a worksheet-by-worksheet basis, you might print some worksheets in a workbook in one orientation (such as portrait orientation) and other worksheets in the same workbook in the opposite orientation (such as landscape orientation). Simply set the orientation for each worksheet as appropriate, and then Print a worksheet or workbook.
-
Change the page orientation when you are ready to print
-
Select the worksheet, worksheets, or worksheet data that you want to print.
-
Click File > Print.
-
In the Page Orientation drop-down box, under Settings, click Portrait Orientation or Landscape Orientation.
-
When you are ready to print, click Print.
Create a template that uses landscape orientation by default
To save time, you can save a workbook configured to print in landscape orientation as a template. You can then use this template to create other workbooks.
Create the template
-
Create a workbook.
-
Select the worksheet or worksheets for which you want to change the orientation.
How to select worksheets
To select
Do this
A single sheet
Click the sheet tab.

If you don't see the tab that you want, click the tab scrolling buttons to display the tab, and then click the tab.

Two or more adjacent sheets
Click the tab for the first sheet. Then hold down Shift while you click the tab for the last sheet that you want to select.
Two or more nonadjacent sheets
Click the tab for the first sheet. Then hold down Ctrl while you click the tabs of the other sheets that you want to select.
All sheets in a workbook
Right-click a sheet tab, and then click Select All Sheets.
Note:When multiple worksheets are selected, [Group] appears in the title bar at the top of the worksheet. To cancel a selection of multiple worksheets in a workbook, click any unselected worksheet. If no unselected sheet is visible, right-click the tab of a selected sheet, and then click Ungroup Sheets.
-
On the Page Layout tab, in the Page Setup group, click Orientation, and then click Landscape.
Note:If you don't have a printer set up, the Orientation option will appear dimmed, and you won't be able to select it. To resolve this, you must set up a printer. The option also appears dimmed when you're editing the contents of a cell. To resolve this, press Enter to accept the changes or Esc to cancel the changes.
-
Make any other customizations as necessary.
Tip:If you want to customize several worksheets at one time, you can temporarily group the worksheets, make your changes, and then ungroup them. To group the worksheets, right-click any tab at the bottom of the worksheet. On the shortcut menu, click Select All Sheets. In the title bar, you should see the name of the workbook followed by the word [Group]. Then, change the orientation to landscape or make any other customization that you want. To turn off the grouping, right-click any tab, and then click Ungroup Sheets (or just click another worksheet tab).
-
Click the File tab.
-
Click Save As, then select the location where you want to save your worksheet. For example, click Computer (or This PC in Excel 2016), and then click Desktop.
-
In the File name box, type the name that you want to use for the template.
-
In the Save as type box, click Excel Template (*.xltx), or click Excel Macro-Enabled Template (*.xltm) if the workbook contains macros that you want to make available in the template.
-
Click Save.
The template is automatically sent in the Templates folder.
To use the template to create a workbook, do the following (for Excel 2016, Excel 2013, and Excel 2010 only):
-
Click File > New.
-
Click Personal.
-
Click the icon or name of your saved template.
-
Top of Page
Change the page orientation in the worksheet
-
Select the worksheet or worksheets for which you want to change the orientation.
How to select worksheets
To select
Do this
A single sheet
Click the sheet tab.

If you don't see the tab that you want, click the tab scrolling buttons to display the tab, and then click the tab.

Two or more adjacent sheets
Click the tab for the first sheet. Then hold down SHIFT while you click the tab for the last sheet that you want to select.
Two or more nonadjacent sheets
Click the tab for the first sheet. Then hold down CTRL while you click the tabs of the other sheets that you want to select.
All sheets in a workbook
Right-click a sheet tab, and then click Select All Sheets on the shortcut menu.
Note:When multiple worksheets are selected, [Group] appears in the title bar at the top of the worksheet. To cancel a selection of multiple worksheets in a workbook, click any unselected worksheet. If no unselected sheet is visible, right-click the tab of a selected sheet, and then click Ungroup Sheets on the shortcut menu.
-
On the Page Layout tab, in the Page Setup group, click Orientation, and then click Portrait or Landscape.

Tip:To see the borders of printed pages more distinctly, you can work in Page Layout view (View tab, Workbook Views group).
Change the page orientation when you are ready to print
-
Select the worksheet, worksheets, or worksheet data that you want to print.
-
Click the Microsoft Office Button
 , and then click Print.
 -
In the Print dialog box, click Properties.
-
In the printer properties dialog box, in the Layout tab, under Orientation, click Portrait or Landscape, and click OK.
-
When you are ready to print, click Print.
Note:If you don't have a printer set up, the Orientation option will appear dimmed, and you won't be able to select it. To resolve this, you must set up a printer. The option also appears dimmed when you're in the process of editing the contents of a cell. To resolve this, press ENTER to accept the changes or ESC to cancel the changes.
Create a template that uses landscape orientation by default
To save time, you can save a workbook configured to print in landscape orientation as a template. You can then use this template to create other workbooks.
Create the template
-
Create a new workbook.
-
Select the worksheet or worksheets for which you want to change the orientation.
How to select worksheets
To select
Do this
A single sheet
Click the sheet tab.
If you don't see the tab that you want, click the tab scrolling buttons to display the tab, and then click the tab.
Two or more adjacent sheets
Click the tab for the first sheet. Then hold down SHIFT while you click the tab for the last sheet that you want to select.
Two or more nonadjacent sheets
Click the tab for the first sheet. Then hold down CTRL while you click the tabs of the other sheets that you want to select.
All sheets in a workbook
Right-click a sheet tab, and then click Select All Sheets on the shortcut menu.
Tip:When multiple worksheets are selected, [Group] appears in the title bar at the top of the worksheet. To cancel a selection of multiple worksheets in a workbook, click any unselected worksheet. If no unselected sheet is visible, right-click the tab of a selected sheet, and then click Ungroup Sheets on the shortcut menu.
-
On the Page Layout tab, in the Page Setup group, click Orientation, and then click Landscape.
Note:If you don't have a printer set up, the Orientation option will appear dimmed, and you won't be able to select it. To resolve this, you must set up a printer. The option also appears dimmed when you're in the process of editing the contents of a cell. To resolve this, press ENTER to accept the changes or ESC to cancel the changes.
-
Make any other customizations as necessary.
Tip:If you want to customize a number of worksheets at once, you can temporarily group the worksheets, make your changes, and then ungroup them. To group the worksheets, right-click any tab at the bottom of the worksheet. On the shortcut menu, click Select All Sheets. In the title bar, you should see the name of the workbook followed by the word [Group]. Then, change the orientation to landscape or make any other customization that you want. To turn off the grouping, right-click any tab, and then click Ungroup Sheets (or just click another worksheet tab). Don't forget to ungroup the worksheets. When worksheets are grouped, whatever you do to one worksheet affects all other worksheets, which is probably not what you want.
-
Click the Microsoft Office Button
, and then click Save as. -
In the File name box, type the name that you want to use for the template.
-
In the Save as type box, click Excel Template (*.xltx), or click Excel Macro-Enabled Template (*.xltm) if the workbook contains macros that you want to make available in the template.
-
Click Save.
The template is automatically placed in the Templates folder.
Tip:If you copy any Excel workbook into the Templates folder, you can use that workbook as a template without saving it in the template file format (.xltx or .xltm). In Windows Vista, the Templates folder is usually C:\Users\<your name>\AppData\Roaming\Microsoft\Templates. In Microsoft Windows XP, the Templates folder is usually C:\Documents and Settings\<your name>\Application Data\Microsoft\Templates.
-
To use the template to create a new workbook, do the following:
-
Click the Microsoft Office Button
, and then click New. -
Under Templates, click My Templates.
-
In the New dialog box, double-click the template that you just created.
Excel creates a new workbook that is based on your template.
-
Top of Page
kobayashimarmyre77.blogspot.com
Source: https://support.microsoft.com/en-us/office/print-a-worksheet-in-landscape-or-portrait-orientation-1af561b2-5444-4fc1-b24d-9e4d05b9ebf1
0 Response to "Continue to Next Page on Excel Landscape"
إرسال تعليق